--- Commission Information ---
Scroll down for References images
-Note that some may be NSFW-
Check my Discord for commission pings
I focus mostly on Skin mods - tattoos, scars, freckles, moles and other cool anomalies on the skin.
This can be either on the body or on the face.Male, female and everything in-between accepted - as long as it has the correct permissions.
I only work on The Body & Bibo+ by Tsar and Illy & HR3 by Rayrei
Please consider supporting these creators.
★ Scars -I specialize, and enjoy, more 'semi realistic' scarring, than anime/manga style - but happy to take on anything.
I use real life reverences of different types of scars - from atrophic, keloid, hypertrophic and contracture - and interpreting them to suit the style of the game.
More 'over the top, anime like' im willing to do, also, but any anime references are very helpful as they don't behave or 'work' like realistic ones do. It often does not translate well in 3D on a realistic body.
If you dont have personal art pieces of your character, then I usually give a blank template for yourself to draw on, to give me more precise detail of what you'd like the finished skin to look like.★ Tattoos-
Have realistic expectations - I am not a miracle worker. Im not prepared to hand draw full tattoos. I just dont have time for that. Please give me as many picture references as you can to be applied onto your character, or at least a good idea so I may find one myself. While some tattoo mods out there are unrealistically vibrant at times - I aim to make it look as realistically applied to the skin as possible.
If you are looking for something entirely custom and drawn from scratch, then its best to reach out to others.★Freckles & Moles -
Using a blank template, describing or providing references of where you'd like them to be applied, colouring, how soft or heavy you want them ect.★Other cool anomalies -
Always willing to hear ideas. Tempered flame scars was never in my mind, but when the client came at me with the idea of 'scars from being hit by magic', I had to improvise! Sometimes stuff happens and sometimes good things come out of it. Im open.★Skin 'overlays' & changes to Body Hair -
As seen in my screenshot packs, I can create dirt, grime, blood, wounds, bandages etc for skin commissions, if you have something specific in mind.
Also any changes to Body Hair, if any.★Gear Mashups -
I can mash up max 4 pieces of gear together, on any gear slot (Eg: 4 body pieces, 4 ear pieces ect). You will need to tell me what gear you'd like mashed together. Be open minded as some things that would look good on paper do not always work in practice.
Can also be fitted to a choice of body (except those that are centred around unrealistic/overly large body parts/shapes)

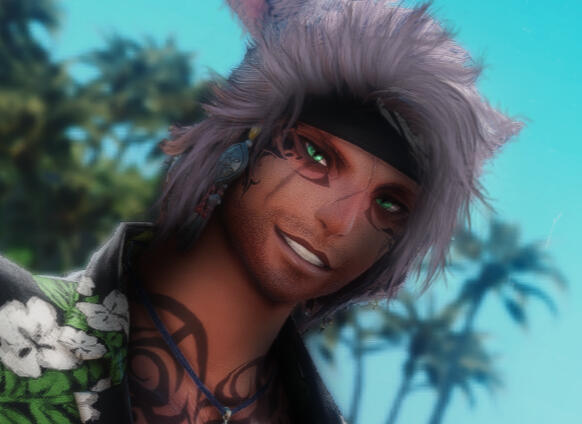
'Tempered flame' scarring & various scars

Various scarring

Freckles and Moles

Body hair removed where scarring is present for realism

Facial scarring + Missing eye

Gear mash up + edited Vanilla hood.

Burns

Custom tattoos (within reason)

Various back scars


Pricing
★ Skins - Face or Body
Depending on the level of work, detail and time it takes to finish then price can vary from $15-60+
Any additional 'overlays' (as seen in my screenshot packs blood/dirt/bandage, bruises ect) $3-5+ each depending on the detail.
3 free changes allowed once the skin is finished - I will keep you updated throughout the process to allow chances for changes.
A body template will be provided for you to draw on and give me the best example of what you are looking for, if you lack any artwork/references of what you want.
Note - If you are seeking scars, best results come from designs that are smaller. The bigger/wider the scar is, the less detail it will have and the more awkward it will look.
Base skin will be supplied, as well as transparent overlays so you can put your commission on top of any future skins should you change.It would be helpful for you to provide the skin tone you use for your character, as well as the race, as skintone varies from race to race.
This will allow me to make scars that suit your characters skin tone better.
★Gear Mashups/Combining pieces
Price - this can vary on how complex the job is but the following is a guess..
2 items - $10
3 items- $13
4 items - $15This will include being upscaled to the Bibo+/TBSE body of your choosing.
Please note-
★I do not work on the T&F3 body. The creator also does not allow private commissions.
★Skin mods will warp on larger body sizes, as body parts were not intended to be that size for the texture.
★I do not upscale or gear mashup to 'fetish body' sizes. Im afraid im just not prepared to take extra time to make clothes fit inflated breasts, butt and thighs.
★If I feel your request is too complex, or will take me more time, I may decline. As the time it will take could exceed what im happy to charge.
Tutorials & Tips
Texture help video tutorial to accompany the switch to DIY texture kits
as per the permission changes by Tsar & Bizu in February 2025.
Written guides also below.
>> Anyone can use these kits. It will take you 5 minutes <<
Make sure you have downloaded GIMP 3.0 if you are using it
How to use overlays/DIY Kits -
Scars, tattoos, burns ect
Face Texture Mods-
...
How to use the Dev kit
This guide uses Scar overlays, but the same steps work for any overlays - tattoo, burns, blood textures ect.This guide will cover the basic steps of editing these overlays for a custom texture, and how to install it.
This guide will be using GIMP
I do recommend using Photoshop
Click the tutorial images to enlarge them
Start with the Diffuse
Images show TBSE, but the same steps are used for Bibo+.
The Diffuse is the 'skin' of the model.

Its going to look much like this. The folders for each option is on the right. The eye means its currently visible. Clicking it will make it hidden.
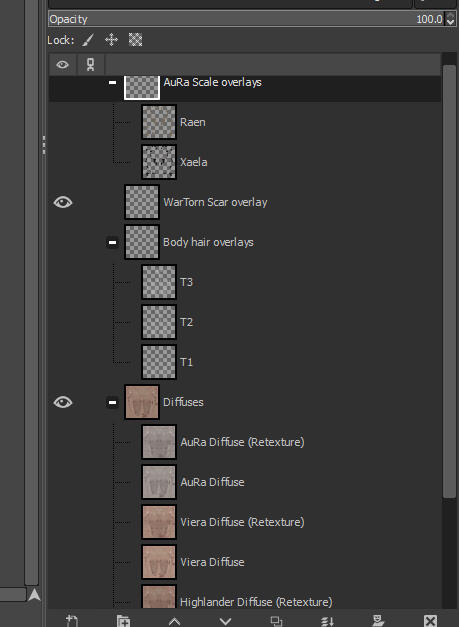
Clicking the plus next to the folder name opens the folder into a drop down. Minus closes it again. Here you can click your chosen choices by clicking the space where the eye would be for that layer.


FYI - The Retexture Diffuse contains extra blushing around the muscle structure, knees, elbows, collarbones, and contains subtle veins across the skin. This is optional and interchangable. If you want to use regular TBSE Diffuse but would like the texture from the Retexture normal, then you can use these together.You will also need to make sure that whatever overlays you are using - Scars, tattoos, body hair ect, is above the Diffuse layer.
Diffuse - Body hair
There are two ways of approaching the body hair -
'Easy' & 'IG Hair colour'.The easy way is for those who want the easy way out or want their characters body hair colour different from their hair colour.IG (In game) Hair colour will keep the body hair the exact colour of your characters head hair colour. It requires 3 textures to work.I'll cover the easy way first.

Selecting body hair will have it appear white. characters hair colour. We are going to change this to the colour you wish. Have the body hair of choice selected in the layers
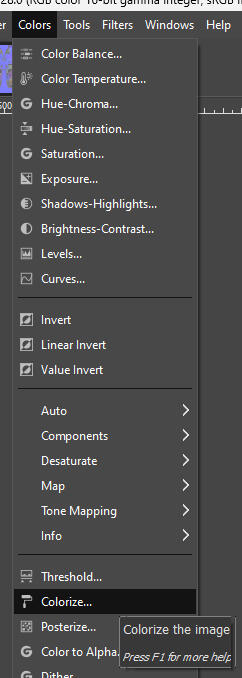
On the tool bar - click Colors then Colorize

The colorize window will appear. Clicking on the 'Color' bar will bring up another window. Here you can select the color you want and it will reflect on the body hair. Tweak it to your liking. Press okay, then okay again the colorize box.
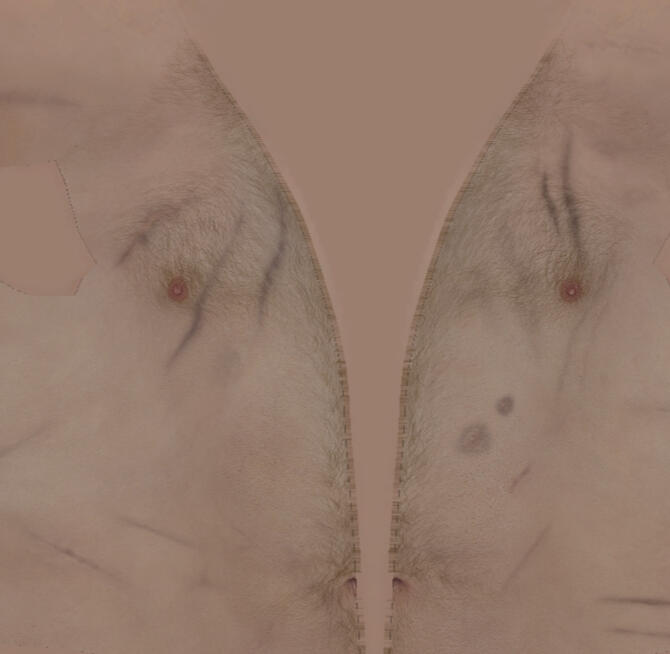
The body hair will now be the colour you want it to be in game.


For IG Hair colour, simply leave the layer as is. It should be pure white. This is what will be reflecting your characters hair colour in game, however you will need extra steps to get it to work.
Saving your diffuse
Once you are finished with your custom Diffuse we now need to save it for use.

On the tool bar - Click 'File' then 'Export as...'
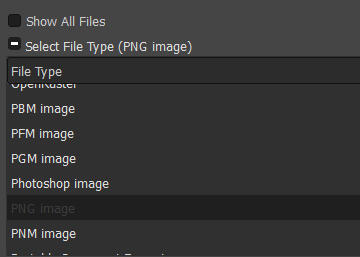
A new window will appear. Click the plus next to 'Select File Type' for the drop down. Scroll until you find PNG and click it. Name your texture at the top of the window then click 'Export'. Save it in an easy place for later installing through Penumbra.


The default save settings will be fine
Next comes the Normal
Open up the Normal file in the Dev kit folder. AuRa has been separated for ease of access. AuRa will be its own section as their textures are a tiny bit different.A 'Normal' is the blue texture that goes 'under' the diffuse to give it faux depth.

It is laid out the same as the Diffuse file. Its simply a case of choosing your desired muscle definition, in either base TBSE or my retexture. Midlander normals cover Midlander, Miqo'te, Elezen and Viera. Highlander and AuRa have separate ones.
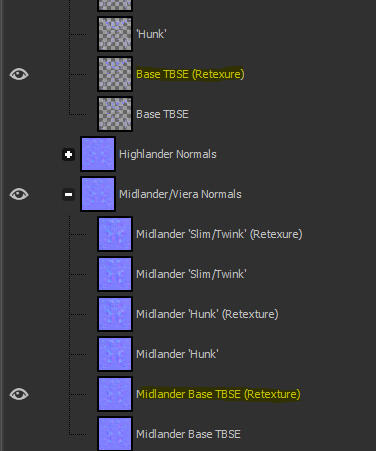
When choosing your options - you must make sure that the overlay options match the texture you've chosen. Choosing differently will create graphical outline errors as the shades of blue in the normal will not fit correctly.
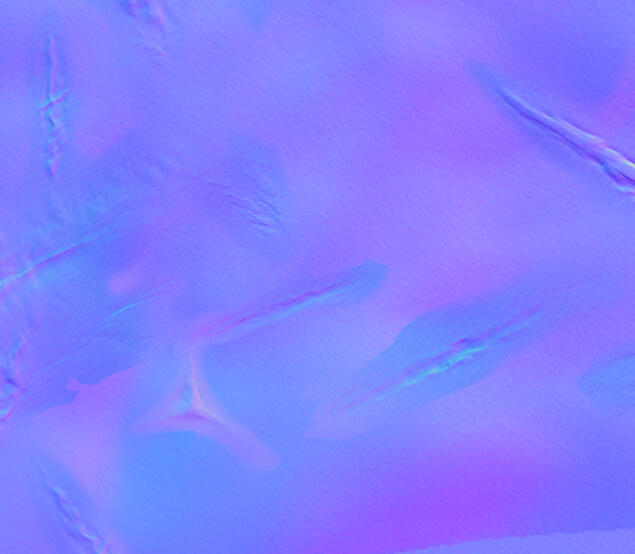
Resulting in obvious errors in the texture
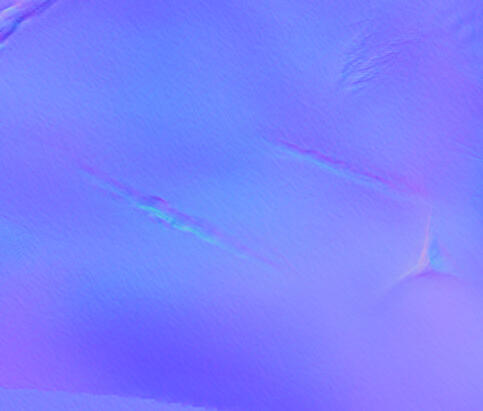
When instead it should be seamless with the Normal.


If you have other overlays that effect the normal, you can lay them here. Bare in mind the two overlays may clash in places. If this happens, you will need to use the Eraser tool to clean up where they overlap.
Normal - Body hair
You will need to use the same body hair options as you used on the Diffuse - eg: If T3 is on the Diffuse, then you will need to use T3 on the normal.

Opening the Body Hair drop down, it will have folders for each option. Simply click the option you want to be made visible.

The folders contain 2 layers - a color layer and a normal layer.If you are choosing the 'Easy way' for body hair, make the 'Colour' layer hidden, and keep the Normal. This will remove the 'yellow' colour from the body hair.
Or alternatively, if you don't want the faux depth on your texture and would prefer the hair to be 'flat', you can skip this part all together and leave the Body hair layers hidden.For IG Hair colour - Make your body hair option visible, with both 'color' & ' Normal' visible. This will make the body hair layer yellow.
AuRa Normals
AuRas normal textures are slightly different. They require an 'Alpha' Channel for the scales. Without this Alpha channel, the scales will be influenced by your characters hair colour, resulting in mismatched scales.The folders are set up in the same way, and requires all the above steps as usual.

Customise your texture first with any extras - Body hair ect. Same body hair rules applies as above.

When you are ready to save, you need to carry out one extra step.
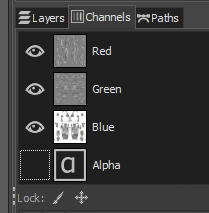
Where the layers and folders are, there is a tab called 'Channels' next to it. Click on this. You can see the Alpha Channel is hidden. Make it visible to activate it.

It should make the scale layer transparent. Its now ready for Export.


Saving your Normal
Once you are finished with your custom Normal we now need to save it for use. It works the same as before -
On the tool bar - Click 'File' then 'Export as...'
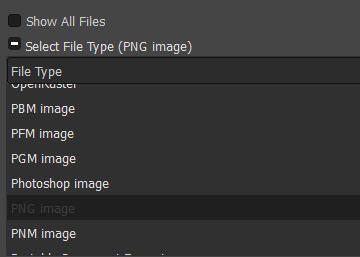
A new window will appear. Click the plus next to 'Select File Type' for the drop down. Scroll until you find PNG and click it. Name your texture at the top of the window then click 'Export'. Save it in an easy place for later installing through Penumbra.


For Midlander bodies & Highlander, default settings are fine.
However, AuRa players will need to make sure that the settings match this image, so the Alpha Channel can be carried into the texture.
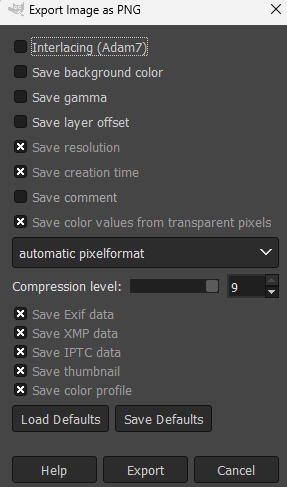
When that is done, click 'Export'

Last is the Mask
The raw Mask files have been provided for ease of access in the 'Masks' folder.
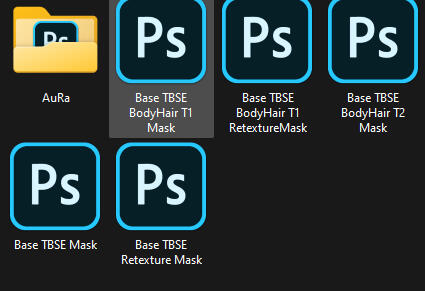
Each will correspond to the options you used in your custom. If you used no body hair - Then you select 'Base TBSE'. If you used T3 body hair with the retexture, then you select ' TBSE Body Hair T3 Retexture Mask' - ect ect. You will need to install these

If you used the easy way body hair option, you just need to use Base TBSE or TBSE Retexture. Do not use a body hair mask.
The mask is what colours it your characters hair colour, and since you have already coloured it the way you wish - there is no need for it.
Make it yours! Editing the overlays
Heres a few tips to help customise even further-
Removing features -
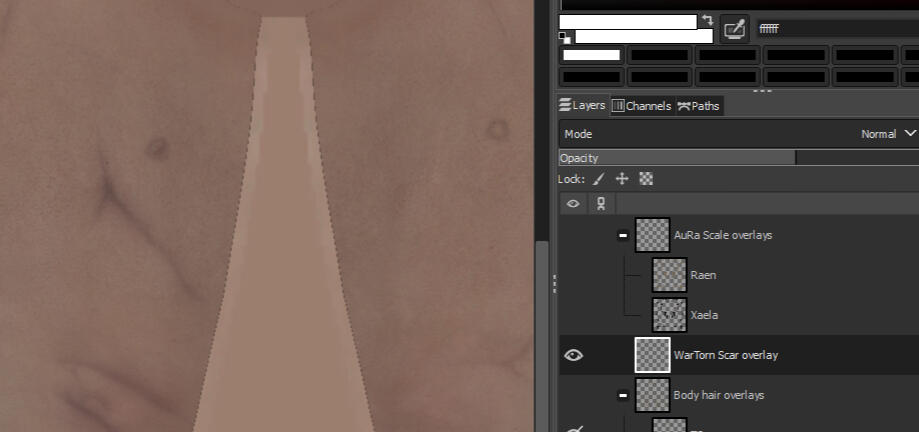
If you dont like these extra bullet holes, or even the scar across the knee - You can erase it. With the Overlay layer selected, simply click the Eraser tool and erase parts of the overlay you do not want.

You will need to erase the same features on the normal overlay as well (if applicable) using the same steps.


If you chose the Easy Way of doing body hair - You can even create alittle more realism. You can erase the hair where scars lay as if scar tissue is now preventing hair growth.Unfortunately you cannot do this easily if you want to use the characters IG hair colour as it requires to also edit the Mask in the same way.

Make sure the layers are selected when you're attempting to erase

Hide the 'Colour' layer of the body hair, and select the hair normal overlay. Erase the hair 'depth'. Make the 'Colour layer' visible again and select it. Do the same on this layer. You will have to do the same on the Diffuse in the same places.


Adding other overlays-

Open up the other overlays you'd like to add along side the Diffuse or Normal kit. Im using a tattoo, so it will go on the Diffuse

Using the Rectangle select tool, drag a box around the overlay to select all of it. Copy it - Ctrl + C.

Ctrl + P to the kit file, above the Diffuse layer. Like the example, you may need to resize it. You can do this by having the layer selected and pressing Shift + T.

It is also helpful to have this option on for lining up the overlay with the size of the Diffuse. On the tool bar click 'View', then click to tick the box for Snap to Canvas Edges

With Shift + T pressed, the box surrounding the overlay will look like this. Using the Edge Square (not the corners), drag the image to fit the whole diffuse

Now it fits the Diffuse corner to corner, press Transform on the window and wait for it to load.

Now you can add all your extras on top and save when you are done. Is it the same steps if you adding to the normal.


EXTRA STEP FOR TATTOO OVERLAYS-
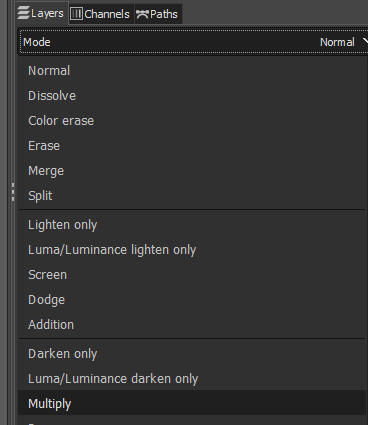
With the tattoo layer selected, just under the layers tab is a 'Mode' drop down. Scroll down and select 'Multiply'.

This will make it look much more realistic, like it is ink under the skin, rather than an image sticker.

This is without the 'Multiply' blend for comparison.


Large DIY kit help (scorched)
With larger DIY kits, I cannot offer every option at risk of making the already large kit even bigger, and have the program lag (Photoshop crashed 4 times in making Scorched for example).So in order to keep it simple, I only offer options on one side of the body, or in one colour option.
These things are easy to change.

So its only offered on one side of the body. In order to flip it - Right Click - Image - Transform - Flip Horizontal

Now its on the opposite side. Remember you will need to do this for both the Diffuse and Normal for it to match.


This is not the only customisation.
Depending on the kind of look you want - Healed or more raw - you can change the contrast of the Diffuse colour to have it look harsher, or more healed.

Clicking Colors and Brightness-Contrast, brings up this box.

Bringing up the contrast will make it look more raw (you can also increase the opacity of the layer for a more intense effect). Don't bring it up too far.

Bringing the contrast down will make it look more faded and healed. (You can also decrease the opacity of the layer for a more faded effect)


While you can't do this on the Normal, you can change the opacity of the normal overlay to lessen the depth effect, or increase it for more.
Installing
Its time to install your new custom textures!
Penumbra -
There is literally no better explanation I can give that this website doesn't do better.
reniguide.info/#loosefiles
You will need the texture paths.
The correct file paths for your body will be in the downloaded mod folder in the Penumbra Paths.txt file.You are now done!
Enjoy the fruits of your work
If Ive supplied empty PMPs -
These I include for ease of access for you to just directly upload your customs into, without needing to mess with path codes.Its already loaded with base textures in the codes for your chosen race/body.
All you need to do is click Advanced Editing then the Textures tab (as described in the above link to Reni's guide)Click the file, locate your custom textures (saved in DDS), then press Save as TEX. Save your textures over the placeholder ones.
How to use the Dev kit
This guide uses Scar overlays, but the same steps work for any overlays - tattoo, burns, blood textures ect.This guide will cover the basic steps of editing these overlays for a custom texture, and how to install it.
This guide will be using Photoshop
In order to Export textures in the most prefered format, you will need to download the DDS plugin from the NVIDIA websiteClick the tutorial images to enlarge them
Start with the Diffuse
Images show TBSE but same steps are used for BIBO.
Differences will be highlighted.
The Diffuse is the 'skin' of the model.

Its going to look much like this. The folders for each option is on the right. The eye means its currently visible. Clicking it will make it hidden.
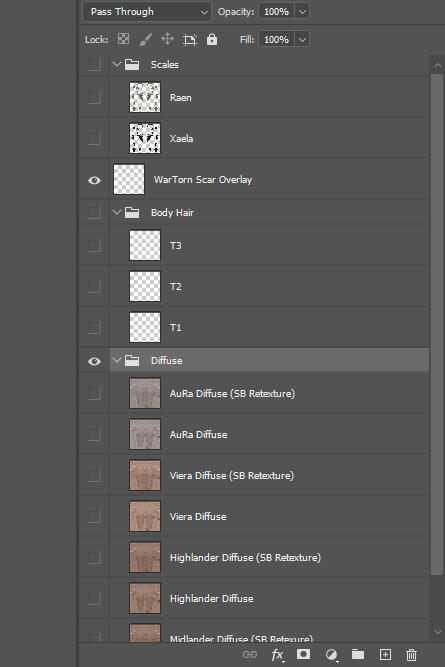
Clicking the arrow next to the folder will open the layers inside. Clicking it again closes it. Here you can click your chosen choices by clicking the space where the eye would be for that layer.


You will need to make sure that whatever overlays you are using - Scars, tattoos, body hair ect, is above the Diffuse layer, but under the Scales layer (if you are wanting AuRa textures)Simply choose your options to get your custom Diffuse created. Its just that simple.
TBSE - Diffuse - Body hair
There are two ways of approaching the body hair -
'Easy' & 'IG Hair colour'.The easy way is for those who want the easy way out or want their characters body hair colour different from their hair colour.IG (In game) Hair colour will keep the body hair the exact colour of your characters head hair colour. It requires 3 textures to work.I'll cover the easy way first.

Selecting body hair will have it appear white. characters hair colour. We are going to change this to the colour you wish. Double click the body hair layer in the layer menu

Click Colour Overlay, then the colour block. In the Colour picker, select the colour you want it to be and click OK

The body hair layer will now reflect the color you've chosen


For IG Hair colour, simply leave the layer as is. It should be pure white. This is what will be reflecting your characters hair colour in game, however you will need extra steps to get it to work.
Saving your diffuse
Once you are finished with your custom Diffuse we now need to save it for use.
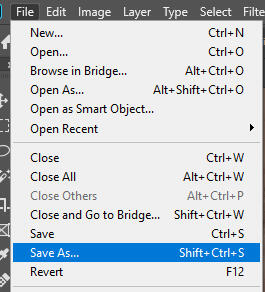
On the tool bar - Click 'File' then 'Save As...'
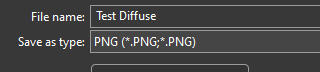
A new window will appear. Name your texture and click the 'Save as type' drop down and select PNG, then save. Make sure its some where you can easily find for when you're installing it into Penumbra


Next comes the Normal
Open up the Normal file in the Dev kit folder. AuRa for TBSE and FemHroth for BIBO has been separated as these two differ slightly.A 'Normal' is the blue texture that goes 'under' the diffuse to give it faux depth.

It is laid out the same as the Diffuse file. Its simply a case of choosing your desired body type.
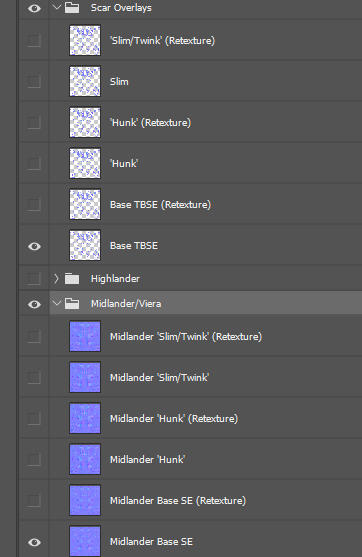
When choosing your options - you must make sure that the overlay options match the texture you've chosen. Choosing differently will create graphical outline errors as the shades of blue in the normal will not fit correctly.
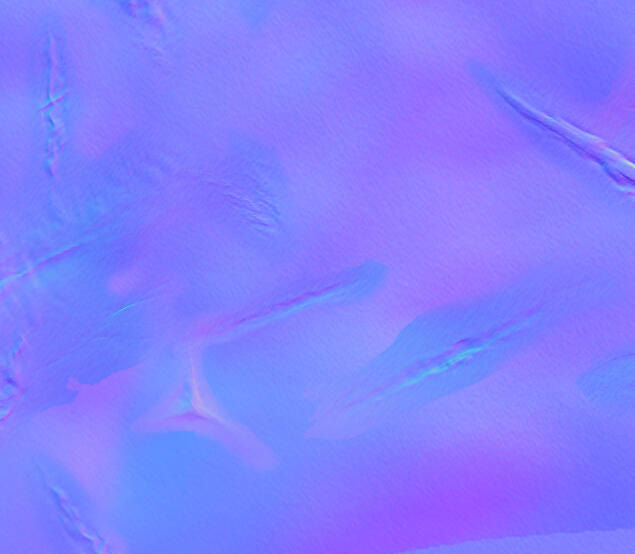
Resulting in obvious errors in the texture
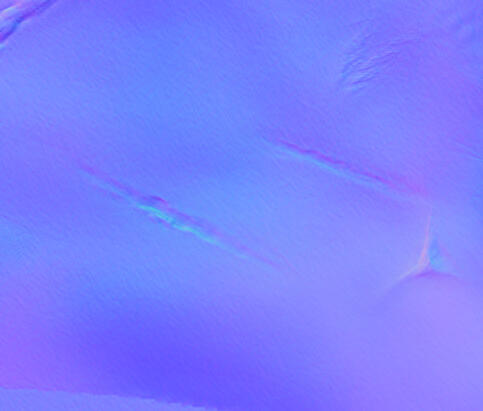
When instead it should be seamless with the Normal.


If you have other overlays that effect the normal, you can lay them here. Bare in mind the two overlays may clash in places. If this happens, you will need to use the Eraser tool to clean up where they overlap.
TBSE - Normal - Body hair
You will need to use the same body hair options as you used on the Diffuse - eg: If T3 is on the Diffuse, then you will need to use T3 on the normal.

Opening the Body Hair drop down, it will have folders for each option. Simply click the option you want to be made visible.

The folders contain 2 layers - a color layer and a normal layer.If you are choosing the 'Easy way' for body hair, make the 'Colour' layer hidden, and keep the Normal. This will remove the 'yellow' colour from the body hair.
Or alternatively, if you don't want the faux depth on your texture and would prefer the hair to be 'flat', you can skip this part all together and leave the Body hair layers hidden.For IG Hair colour - Make your body hair option visible, with both 'color' & ' Normal' visible. This will make the body hair layer yellow.
MAuRa & FHroth Normals
MAuRa and FHroth normal textures are slightly different. They require an 'Alpha' Channel for the scales/fur detailing. Without this Alpha channel, the scales
/fur will be influenced by your characters hair colour, resulting in mismatched scales/fur.The folders are set up in the same way, and requires all the above steps as usual.
Customise your texture first with any extras - Body hair ect. Same body hair rules applies as above.

When you are ready to save, you need to carry out one extra step.
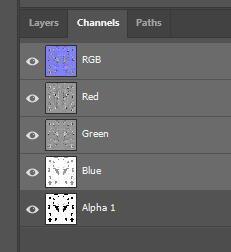
Where the layers and folders are, there is a tab called 'Channels' next to it. Click on this. You can see the Alpha Channel is hidden. Make it visible to activate it.

It will now make the scales Red. This means the Alpha is active and ready for Export. This requires being exported in a DDS BC7 format which the Plugin mentioned at the start of the tutorial is needed for

Alternatively - FHroth's alpha turns the skin red, but leaves the fur detail intact.


Saving your Normal
Once you are finished with your custom Normal we now need to save it for use. It works the same as before -
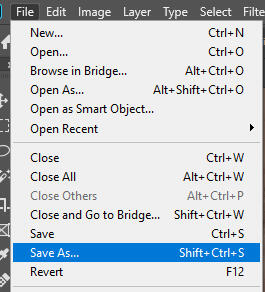
On the tool bar - Click 'File' then 'Save as...'
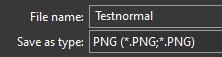
If your texture is for anything but AuRa, you can save this as a PNG for simplicity, or as DDS as explained below


DDS is the games most prefered format, and this is required for AuRa textures due to the Alpha.
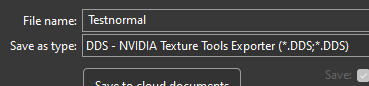
Select DDS from the drop down instead

Make sure your texture is set to BC7 looks the same as this. The scales should be transparent. Click Save

FHroth should look like this


Last is the Mask
This step is not always required! If Mask textures have not been supplied in the folders - Disregard this step
The raw Mask files have been provided for ease of access in the 'Masks' folder.
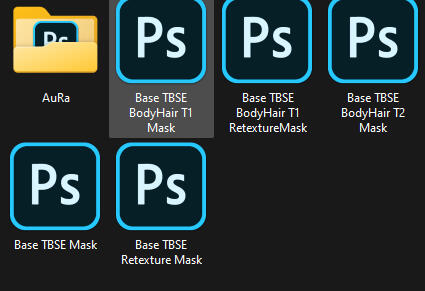
Each will match to the options you used in your custom. If you used no body hair - Then you select 'Base TBSE'. If you used T3 body hair with the retexture, then you select ' TBSE Body Hair T3 Retexture Mask' - ect ect. It needs to be installed in Penumbra

If you used the easy way body hair option, you just need to use Base TBSE or TBSE Retexture. Do not use a body hair mask.
The mask is what colours it your characters hair colour, and since you have already coloured it the way you wish - there is no need for it.
Make it yours! Editing the overlays
Heres a few tips to help customise even further-
Removing features -

If you dont like these extra bullet holes, or even the scar across the knee - You can erase it. With the Overlay layer selected, simply click the Eraser tool and erase parts of the overlay you do not want.

You will need to erase the same features on the normal overlay as well (if applicable) using the same steps.


If you chose the Easy Way of doing body hair - You can even create alittle more realism. You can erase the hair where scars lay as if scar tissue is now preventing hair growth.Unfortunately you cannot do this easily if you want to use the characters IG hair colour as it requires to also edit the Mask in the same way.

Make sure the layers are selected when you're attempting to erase. You will need to erase the colour layer and the 3D layer

Hide the 'Colour' layer of the body hair, and select the hair normal overlay. Erase the hair 'depth'. Make the 'Colour layer' visible again and select it. Do the same on this layer. You will have to do the same on the Diffuse in the same places.


Adding other overlays-

Open up the other overlays you'd like to add along side the Diffuse or Normal kit. Im using a tattoo, so it will go on the Diffuse

Using the Rectangle select tool, drag a box around the overlay to select all of it. Copy it - Ctrl + C.

Ctrl + P to the kit file, above the Diffuse layer. Like the example, you may need to resize it. You can do this by hovering your cursor at the corner and dragging the image to fit the entire diffuse
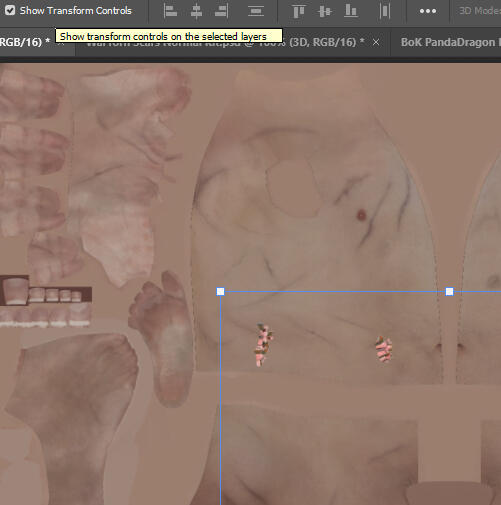
If the squares do not appear, press the 'Show Transform Controls' as shown

Now it fits the Diffuse corner to corner, press Enter.

Now you can add all your extras on top and save when you are done. Is it the same steps if you adding to the normal.


EXTRA STEP FOR TATTOO OVERLAYS-
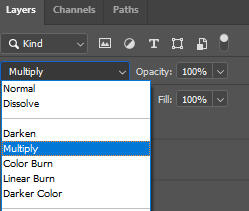
With the tattoo layer selected, just under the layers tab is a 'Blender' drop down that is defaulted to 'Normal'. Scroll down and select 'Multiply'.
This will make it look much more realistic, like it is ink under the skin, rather than an image sticker.
This is without the 'Multiply' blend for comparison.


Large DIY kit help (scorched)
With larger DIY kits, I cannot offer every option at risk of making the already large kit even bigger, and have the program lag (Photoshop crashed 4 times in making Scorched for example).So in order to keep it simple, I only offer options on one side of the body, or in one colour option.
These things are easy to change.

So its only offered on one side of the body. In order to flip it - Click Edit - Transform - Flip Horizontal.

Now its on the opposite side. Remember you will need to do this for both the Diffuse and Normal for it to match.


This is not the only customisation.
Depending on the kind of look you want - Healed or more raw - you can change the contrast of the Diffuse colour to have it look harsher, or more healed.

Clicking Image - Adjustments - Brightness and Contrast will bring up this box. You can slide these around to get a look you want. (Keep in mind, your characters skin colour will also effect the look of it in game)

Bringing up the contrast will make it look more raw (you can also increase the opacity of the layer for a more intense effect)

Bringing the contrast down will make it look more faded and healed. (You can also decrease the opacity of the layer for a more faded effect)


While you can't do this on the Normal, you can change the opacity of the normal overlay to lessen the depth effect, or increase it for more.
Installing
Its time to install your new custom textures!
Penumbra -
There is literally no better explanation I can give that this website doesn't do better.
reniguide.info/#loosefiles
You will need the texture paths.
The correct file paths for your body will be in the downloaded mod folder in the Penumbra Paths.txt file.You are now done!
Enjoy the fruits of your work
If ive supplied a blank PMP -
These I include for ease of access for you to just directly upload your customs into, without needing to mess with path codes.Its already loaded with base textures in the codes for your chosen race/body.
All you need to do is click Advanced Editing then the Textures tab (as described in the above link to Reni's guide)Click the file, locate your custom textures (saved in DDS), then press Save as TEX. Save your textures over the placeholder ones.
How to use the Dev kit
Due to on going problems Im having with GIMP, and the beard overlays and PSD not playing nice with it - I will only be covering Photoshop in this tutorial.
It is my biggest recommendation to procure Photoshop one way or another if you want to create customs for 7.0.
This guide will be using Photoshop with notes for GIMP
Photoshop -In order to Export textures in the most prefered format, you will need to download the DDS plugin from the NVIDIA websiteGIMP needs no extra downloadClick the tutorial images to enlarge them
Start with the Diffuse
The Diffuse is the 'skin' of the model.Every face has been provided in the PSD files but if you already have a custom face/make up then you can paste it here.The images will cover Vanilla faces, but the same steps are applicable to ASYM Faces. The difference is ASYM has both sides of the face to make it Asymmetrical, while Vanilla is mirrored.
If you are using ASYM faces, then you will require the original ASYM faces by spiswel mod for this to work.

Its going to look much like this. The folders for each option is on the right. The eye means its currently visible. Clicking it will make it hidden.
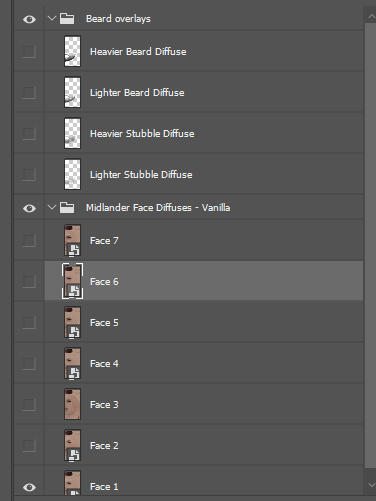
Clicking the arrow next to the folder will open the layers inside. Clicking it again closes it. Here you can click your chosen choices by clicking the space where the eye would be for that layer.

Choose the Face you are using, then select which facial hair option you want and its done!


This is also the time to add any other Diffuse overlays, like scars or tattoos.Alternatively - If you wish the Facial Hair to be a different colour -Photoshop : Double click the beard layer that you want to use, select Colour Overlay and choose which colour you want to turn it to.GIMP : On the top toolbars click Colours - Colourize - and clicking the coloured bar in the box, select the colour you wish then press OK on that box and OK again.Done!
Saving your diffuse
Once you are finished with your custom Diffuse we now need to save it for use.
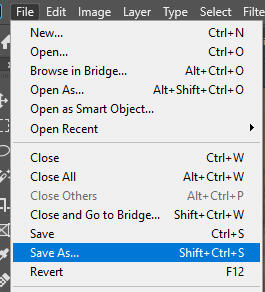
On the tool bar - Click 'File' then 'Save As...'

A new window will appear. Name your texture and click the 'Save as type' drop down and select DDS. If this does not show for you, you will need to install the plugin that was linked at the start of the tutorial. PNG will not save the required alpha channel

Make sure the format is BC7 and you have 'Both' selected. Save this somewhere you can find easily for when you install in Penumbra
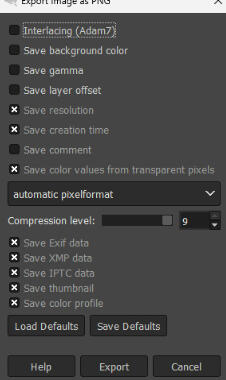
For GIMP: File - Export As - PNG. Then make sure the tick boxes match here as shown for Alpha channel to carry with it, like a .DDS file


Next comes the Normal
Open up the Normal file in the Dev kit folder.A 'Normal' is the blue texture that goes 'under' the diffuse to give it faux depth.
This step is technically optional.
You can use just the Diffuse if prefered

It is laid out the same as the Diffuse file.
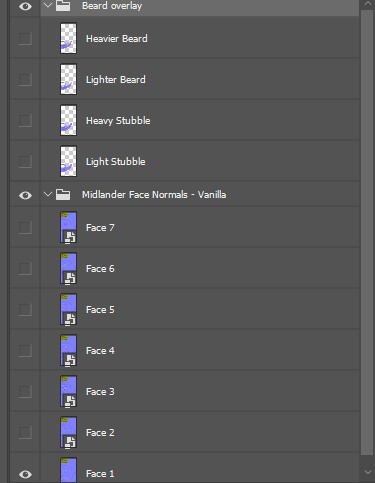
Choose the same option as you did for the Diffuse

and your Normal texture is done!


Like the Diffuse, this would be the time to add any Normal overlays to your custom, if the Diffuse requires them.
Saving your Normal
Once you are finished with your custom Normal we now need to save it for use. It works the same as before -
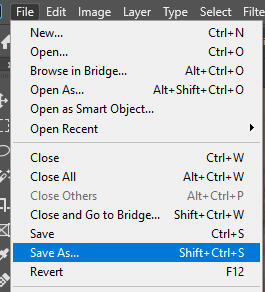
On the tool bar - Click 'File' then 'Save as...'

Then select DDS

The alpha channel will make this appear mostly transparent as shown. Make sure you select the same options here, which are the same as the Diffuse. Save this where you can easily access it
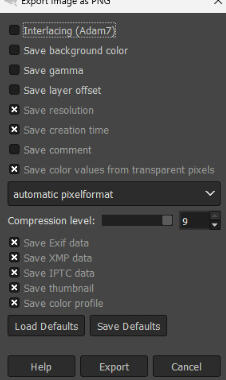
For GIMP: File - Export As - PNG. Then make sure the tick boxes match here as shown for Alpha channel to carry with it, like a .DDS file


Last is the Mask
The raw Mask files have been provided for ease of access

The Vanilla Mask is in the 'Vanilla Raw Textures' folder, and the Asym mask in 'Asym Raw Textures'.

There is no need to edit these, but it is required!
Make it yours! Editing the overlays
Heres a few tips to help customise even further-
'Styling -

With a soft eraser brush, you can erase parts of the facial hair you dont want for a custom style. Make sure you have the overlay selected that you want to edit

If using the normal, you will have to erase the same parts to match. Save your texture as described in the tutorial

If you are using ASYM faces, then I recommend styling it on Vanilla first. Then with the edited overlay selected, copy and paste it over to the Asym file.

You will need to move it into place on one side of the face. The markers in the corner of the overlay should help in lining this up.
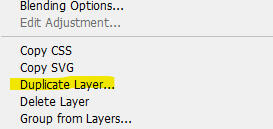
Right click on this pasted in layer and select 'Duplicate Layer...' at the top

Now we have two.

With the copied layer selected, click Edit - Transform - Flip Horizonal

Now you can move the other section of the beard into place on the face texture. You will need to do this for the normal as well, if you are using it. Now save your textures!


EXTRA STEP FOR TATTOO OVERLAYS-
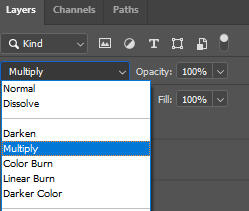
With the tattoo layer selected, just under the layers tab is a 'Blender' drop down that is defaulted to 'Normal'. Scroll down and select 'Multiply'.
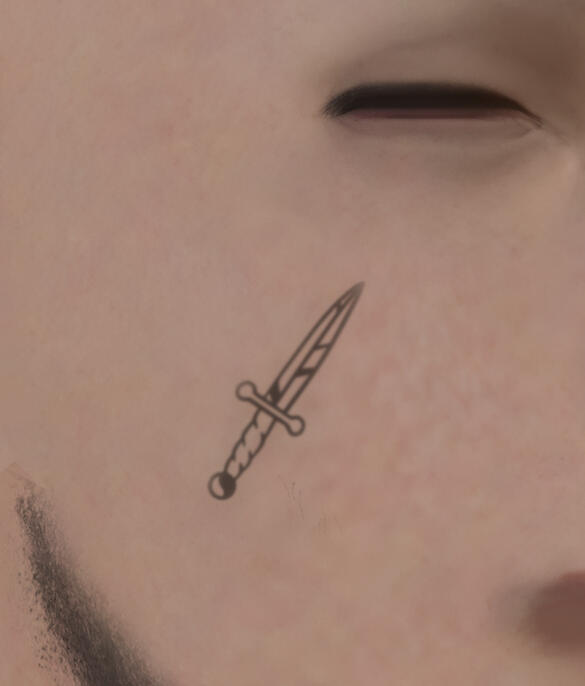
Make the opacity somewhere between 70-90. Both of these steps will make it look much more realistic, like it is ink under the skin, rather than an image sticker.


Installing
Its time to install your new custom textures!
Penumbra -
There is literally no better explanation I can give that this website doesn't do better.
reniguide.info/#loosefiles
You will need the texture paths.
The correct file paths for your body will be in the downloaded mod folder in the Penumbra Paths.txt file.You are now done!
Enjoy the fruits of your work